Kaleidoscope Creations

thecutstudio @ gmail . com

Showing posts with label gardening. Show all posts

Thursday, November 8, 2012

My first canning session...

Last Christmas I asked for a canner and it had been waiting nearly 10 months for me to use it. I was hoping to get enough from my garden to can stuff, but alas, that didn't happen. Unless you count the hot peppers. And I don't like hot peppers! I only had the seeds because they were given to me though my husband likes them. (And I was totally screwed on bell peppers! Just a few very small ones.)


So I found a recipe online for hot pepper relish (mine does not look as pretty but my peppers were more varied and not many had turned red. *sigh* )  Because it uses vinegar, the method for canning is a hot water bath. Which is just as well for a beginner.

So here is the result. I had enough for about 13 jelly jars - but the last of it I just put in a jar in the fridge since 1. the canner only fits 12 and 2. I only had 12 jelly jars. As it turns out, it seems the yellow wax peppers bother my husband's stomach. Damn. As I said, I don't really like hot peppers but it turns out it's not really hot so I've mixed a couple spoonfuls into salsa. Not bad. It's the only way I'll be able to eat it though.

Saturday, July 14, 2012

garden tour

So, this is my garden at the moment. Kind of pathetic, but there you have it.
The view of the garden area as seen outside my back door. This doesn't show areas to the right in my yard where I have a few more smaller raised beds. Two along the back fence and another small one to the right.
Starting from the left.... We have carrots and strawberries. Almost all the carrots at the back didn't come up. The slugs quite enjoyed the strawberries before I got very many of them. And they have some blight or something. I was actually getting some decent strawberries this year but the creatures beat me to them most of the time.
Next to them is onions and peas at the back. Most of the peas didn't come up either (as well as some onions, which are looking kind of sad, too.)
Next we have spinach and lettuce. There will be another raised bed here, though I may actually turn it horizontally here so more of it will get sun a bit longer. But I already was planting the early crops before I was sure I was getting raised beds so the material is waiting in the shed. Again, quite a few seeds didn't germinate. (I'm convinced mother nature is being mean to me.) I had sown seeds for 7 heads of lettuce. Most didn't come up so I tried again. Still not good luck. This was all I ended up with. (Ignore the weeds I gave up on in the spinach bed when the spinach was about gone.)
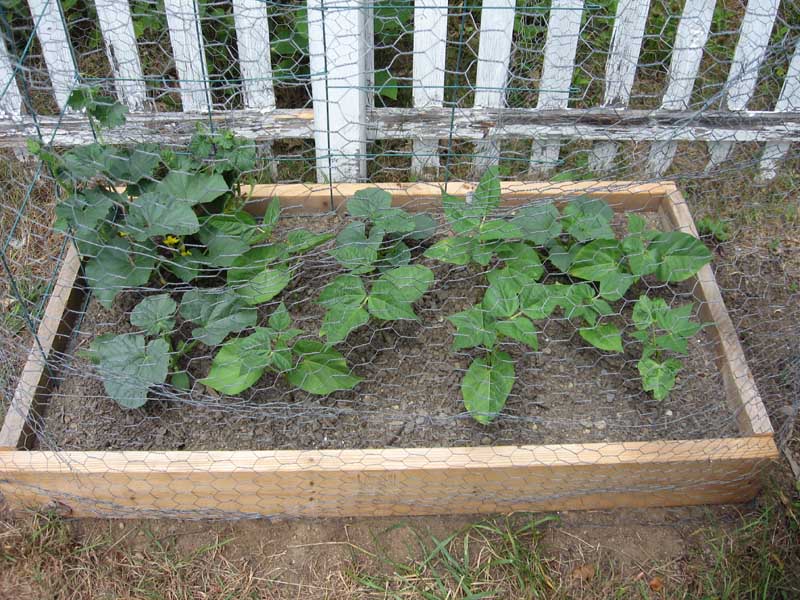
This bed has zucchini (which I've been waging war with squash bugs), pickling cukes, onions, bell peppers (another sad story), banana pepper, and I think I finally got an eggplant to start - it doesnt look like a weed. The compost I threw on top of the weed barrier as mulch when I was going away for several days to help keep the moisture in while I wasn't around to water. (The barrier is only one one side of the bed.)
This is all tomatoes. These I threw wood mulch on top of the plastic weed barrier I have in this bed.
At the back we have corn and beans. Crossing my fingers I get any corn at all. I will be ecstatic if I get some edible corn.
To the left of the corn I threw some melon seedlings into the grown. Rogue seedlings I discovered in my kitchen compost bucket.
At the front of the garden, I used some scraps of wood to make this mini bed for pumpkins. I figured the vines can just trail over the sides. They're finally growing. They were getting little flower buds while they were still tiny.
I forgot to get a picture, but I have a large pot (you can see in the first pic) that I put table squash in. Only they didn't want to germinate, so I put a few more in. I have finally seen a couple of sprouts today. Mother nature might play another trick on me and still have most of them sprout. I had that happen with pumpkin and cantaloupe seeds. Germinated months later. WTH???

Now, here along the back fence to the right of my large garden area is cauliflower. It stayed tiny in the starter pots. Finally started growing decent after a couple weeks in the ground. And my one marigold that sprouted even though I put seeds around the whole perimeter. Mother nature doesn't like me. :( 
Here we have cantaloupe, 2 asian melons, and yellow wax beans.
And here are hot peppers. A cruel trick of mother nature because I don't eat hot peppers so wasn't so concerned with them! (Though my hubby will.) The packet of seeds were given to me and they were old so I threw the whole packet in a wet paper towel to germinate (also do some of my other seeds that way) and wouldn't you know it... almost all those litter suckers sprouted!! Well, I get attached to my 'babies' I give 'birth' to so I couldn't just throw them out. Neither did I have the room to grow them individually, so I put them in the cells by 2's. Twelve cells with 2 plants each - and they were growing nicely, too. WTH?? Nothing else I had started from seed grew as easily! I gave one 4-cell pack to my backyard neighbor she could give to her son. So here's my little plot with the 16 hot pepper plants I still had left.
So I've been keeping track of what I get out of the garden to see how much return I'm getting on my investment this year. I need to produce about $100 worth of fruit and veg to make up for the money I sunk into making raised beds this year. (Which is looking rather pathetic right now.) Previously I was planting in the ground and you can see from the top pics I have crappy soil. I've been weighing the zucchini and cucumbers. The lettuce and spinach I'm just kind of making up as guesstimates. Like the spinach you buy in bags at the store - I probably got like a dollar's worth at best. The lettuce I've been harvesting leaves rather than cutting it as a whole head and I'd say I've gotten about a head's worth so far that I've eaten. The peas weren't even enough worth counting. Maybe I got a dime's worth. :P


Saturday, April 28, 2012

Durable plant markers

I have come up with another use for old cutting mats used in electronic die cutting machines. In my case, it would be cricut mats. Sturdy plant markers! I didn't even concern myself with cleaning the sticky side. I see no need to waste water, cleaning supplies, and time doing that. You can use the lines on the mat as your cutting guide. I used an old 6 x 12 mat. You can cut off the ends if you wish, or use the whole thing. A good, sturdy guillotine cutter works great. Or you can cut by hand with scissors.
If you cut it in half inch strips (mat laid horizontally as pictured above)and then cut those strips in half you can get 2 small pieces. Cut a point at one end. Those are good for marking pots like this.
If cut the mat in 1 inch widths, they make good garden markers. My mat was curled on the edges so I trimmed off one end.
Then I cut the other end into a point. I used the back side to write the label with a Sharpie marker.
Now you have a sturdy, durable way to mark your plants and another way to recycle those old cutting mats!

Friday, March 16, 2012

A planning and a plotting.....

I have spent allllll day working on my garden design. And here is my result after all day figuring it out. It messes with my greenhouse (pvc hoophouse) setup though because of the cool weather plants. *sigh*
It looks much neater in diagram than it will IRL. I found out cauliflower doesn't play nicely with others and is picky (snobby vegetable!) so I'm planting it outside the main garden. The two plots on the side are actually 4 - 5 feet apart since I have a couple of peony plants over there. The left plot is a few feet from the right side of the garden. Or will be when I get them built. I have enough lumber that was left behind here (probably by whichever past owner built the shed) to make the two plots. Radishes will be thrown in among tomatoes and whatever so I didn't plot them in the diagram. BTW - those purple things are onions, not turnips. I made them purple but they're spanish onions. I was snagging clipart online and didn't really think about it.
This website has an online garden planner but my plan below I made in photoshop. I needed to see my garden as a whole and I couldn't do that with the planner but it's a great resource. Be sure to check out more of the site. I printed this off today and am going to get the dates figured out. Vegetable planting guide PDF
Also, check out almanac.com for your frost date and stuff like that. I wrote down all the indoor (for transplanting) and ground planting dates for what I'm growing. I'll do the math for the worksheet and compare the two before I actually write them in. I know some stuff I need to get started now. What I also learned is that I can actually plant peas earlier than they tell you - as soon as you can work the ground. And apparently, St. Patrick's day is a tradional pea-planting day up here! I'm not quite that ready yet though. Unfortunately, it rained today so I won't be able to work the soil tomorrow. However, I should be able to in a few days. Meanwhile, I can start getting my indoor seeds planted and tomorrow I'll have to go into the shed and see what pots and stuff I can find that I've saved from the plants I used to buy. This year it's all seed! *insert face of horror here*
P.S. Whoever previous owner put up the fence in the back yard had angled that back corner, that's why the diagram looks like that. LOL

Thursday, November 17, 2011

The great pumquash experiment...

This is the result. Now, if you don't know what the great pumquash experiment is you need to click here first to read how it came about. So here they are, looking all cute. I ended up with 7 before the frost got too bad. I lost a few babies but all in all, not too shabby really. (Especially considering I do not have a great garden and then the other things I had to contend with.)  

Well, this one had started getting all soft and molding on one side so it was time to cut one open to see what surprise awaited inside. Would it be more like a pumpkin (as the outside suggests)? Or would the inside reveal more of a summer squash? It looks like it's mommy on the outside but...  

It takes after it's daddy on the inside. I'm a bit bummed about that. I was hoping it was going to be a great new way to have pumpkins for eating. Looks like it won't be pumpkin pie, they'll have to be used like you would summer squash/zucchini.

Friday, September 9, 2011

Pumquashes

This is what you get when you cross a sugar (pie) pumpkin with a summer squash.

Last year was my first time planting pumpkins. I saved the seeds from a sugar pumpkin I bought at the store the year before. Well, a pesky woodchuck (aka groundhog) snacked on my plants eating most of the leaves off while it was still fairly young. It came back for a second helping after it grew back!

Finally, the vines were on their way but it was really late in the season. I wasn't taking chances - I got a fruit but not a bunch of male flowers around when I needed them (typical, huh? LOL). Knowing pumpkins are from the same family as summer squash (cucurbit) I used a male flower from the squash to pollinate my baby pumpkin. If I got just ONE pumpkin I was going to be ecstatic. I didn't even think about genetics.

I nurtured my baby, covering the plant when the nights got cold and we might get frost. In October it got enough orange that I could take it from the vine and let it finish ripening where it was safe. I kept it as a decoration for awhile then I finally cut it open to make pumpkin puree for pies and bread and I saved the seeds to plant new ones the next year.

And here they are... aren't they so cute? I'm having pretty good luck with these. I've got another one that started on the vine. I'm thinking if they taste about the same as the sugar pumpkins this may be the way to go!